Showing posts with label Project Run and Play. Show all posts

Thursday, January 22, 2015

Bubble skirt et all

There is nothing quite so easy to sew as a skirt. The fitting is fairly simple and you can often get away with two side seams and a waist band.


And when you want more variety, there are a ton of great tutorials to help you create this wardrobe staple. 

Project Run and Play is doing something different this year by having a linky party each month for a pattern remix. January is Alida Makes' Bubble Skirt/Dress.  When I saw the theme, I thought it was the perfect time to review the tutorial and highlight other great skirt tutorials. 
In order to avoid the shirring requirement in Alida's skirt, I used a knit (an old shirt belonging to my son before he out grew it.). I simply stretched it while sewing it to the main fabric the way you would ribbing on a tee shirt. 


For the waist band I used the technique described on Made in this great circle skirt tutorial.

link

On our Pinterest site we collect all sorts of tutorials we like that you can check out but here are a couple other great skirt tutorials for you to try:

link
link
link


The cardi that is in this picture is from last year. She actually has barely worn it because she was not a fan of the ruffles. Tweens can be so fickle. But I think they pair beautifully and much better than the jeans she insisted on wearing with the skirt. 


There is also a very fun event at Friends Stitched Together; a series called CraftingCon and this month's theme is Dr. Who. My daughter loves the show and I thought I could style her up as a tardis for a photo shoot. But she was not in the mood. 

Tuesday, October 7, 2014

Project Run & Play Signature Style Plus a Review...Kind Of

Classic Gone Global...
That's what I'm calling my signature look for Project Run and Play.
This look takes a little global twist to a great classic of a pattern. And since we appear to be global with all of the things my globe trotting husband brings home from places like Africa and India, I thought it would fit to make this my signature look. I love the simplicity and longevity of a good classic garment, but it's always fun to spin it a slightly different way. 
I originally made this dress and posted about it here, as part of the summer FLIP series over at Frances Suzanne.

The original pattern is the Ethan Shirt by Sis Boom
It is a great pattern for a button up shirt that would work well for a boy or girl, that is well written and easy to follow. I would put it at an advanced beginner level. The pattern really does walk you through all of the steps, even if you haven't done a collar with a stand of sleeve cuffs you should give it a try!  So while I haven't sewn it up as is yet...I would still give this one 4 bolts for being a great pattern!  When I actually sew it up as is, I will give it a more thorough review, but I would highly recommend it if you need a button up shirt pattern!
 To get this look, I left off the collar and used the collar stand to create a Mandarin looking collar.  I obviously elongated the hem to make it a dress instead of a shirt and gave it more of an A-line shape. I also added 2 pockets instead of one, cuffed the sleeves with a tab and added black piping throughout. Oh and I put in one back pleat in the middle instead of the pleats on each side.
 We had visions of taking pictures at the botanical gardens here because there is a cool Oriental Gardens there, including some cool outer structures and bridges...but life happens and that didn't. I'm always in awe of the amazing 'photo shoots' people do to document the clothes they've created...then I remind myself they are usually little kids and those people don't usually have 2 teenagers going 2 different directions, a pre-teen with her own activities and a 6 year old as well. It's not that we have our kids in a lot of activities, it's just that as they get older those activities require more time, the kids require more running around and frankly taking pictures is not what they want to be doing with their free time...plus bribery at that age is a little more expensive. A lolly pop just doesn't cut it anymore. That being said, I love how these pictures turned out...she looks beautiful in them.

Wednesday, April 9, 2014

Easter Dress with a Review

It's 'Design Your Own Fabric' Week over at Project Run and Play, so I thought I'd play along and make Sophia an Easter dress to boot. As for how I designed the fabric, I tried two new things--ombre dying and detailing by sewing down embroidery thread.
The pattern is Simplicity 3510, but it's apparently out of print. 
And it only went up to a size 8...but it is a really easy pattern to alter up a size or two.
Even so it's a great pattern. Easy to follow instructions and lots of options. If you ever have a chance to get your hands on this pattern, it would be one worth having.
Here's my finished look and you kind of see the ombre a little better. It didn't turn out quite as I envisioned, but I do like it. But what I like the best is the thread detail on the bodice.
As for the pattern, it is an easy sew, with no buttons or zippers.  It works great with wovens of any kind and would be a great beginner pattern for someone that wants just a little more detail to follow.
I would give this pattern 5 bolts if it were available...in larger sizes.
 As for the changes I made, I added a little to the side seams as well as to the lengths of the bodice and skirt. And to make it a little less "little girl" like I did pleats where it said gathers. 
To get the detailing on the top, I first drew out my design with water soluble pen. Then I put a little glue (simple Elmer's) on the line and laid the embroidery thread down. Once it was dried, I just did a small zigzag in a lighter shade of green.
 A close up look of the embroidery thread detailing.
 I really like it with this vintage orange trim, tied at the waist. She didn't like it so much.
 What's your opinion?


Monday, March 31, 2014

Pattern Review: Shirt With Bow Tie 08/2012 #152


Ok, we just don't do enough for boys here.  But the problem is that Sally and I do not have tween boys.  Sally's boys are already well into the teenage years and my boy is only 6 years old.  To compensate, we try to have guest bloggers come over and give helpful hints and pattern reviews.  But there does not seem to be a lot out there.  Which is too bad because I love to sew for my boy and I hope he continues to greet his mom-made clothes with enthusiasm as he grows. 

This is the picture from Burdastyle.


Today I am sharing a pattern I made for my son but the sizes go up to 140 (European sizes) which is about a size 10.  Plus this pattern could easily be lengthened so if your son is thin, you probably would not have to make too many adjustments (length and shoulders).


The review:


Name of the pattern:  The pattern is called Shirt With Bow Tie 08/2012 #152 which is not that creative of a name.  I have not yet made the bow tie, but I plan to soon.


Pattern Source:  This pattern is a print at home .pdf that you can purchase at burdastyle.


Sizes available:  It comes in European sizes 116 through 140.

Special materials required:  You need eight buttons for this shirt, six down the front and two for the cuffs.  Also, you will need interfacing for the placket, cuffs, and collar pieces.


Skill level required:  The shirt is an intermediate level pattern.  This is actually my fourth time sewing it and the first did not look this good.

How you came to choose the pattern:  I am starting to have this be my go-to pattern for my son.  He likes to wear button up shirts and they are nice for church.  I have made him a couple out of flannel and this one is for Easter.  He picked out the fabric as he is a bit of a wild guy when it comes to fashion.

I used a decorative stitch to fancy up the yoke.

 Good:  I love the professional look that this pattern gives the end product.  I could buy dress shirts that look just like this but I love that I am able to make them so that they fit my slim guy and in the crazy fabrics that he prefers.


Bad:  That wrist placket is tricky.  Take your time and you will be fine.  Also, the pattern does not come with seam allowances, so you will have to add your own.  That is not hard, but it is annoying.

Overall pattern rating:  I give this pattern (5) bolts.  If you asked me the first time I sewed it, I probably would have only said 4.  But, I am coming to find out that the problem was not with the pattern, but with me.

Monday, February 3, 2014

Pattern Review: Ashli's Pleated School Dress

My mother sewed my clothes when I was a kid and she really did a great job.  Before the school year would start, she would take me and my sisters to the fabric store to go through the pattern books to pick out the pattern.  Then we would go pick out the fabric for each pattern.

I always had a hard time picking out the patterns because I would get distracted by the fabrics and styling used in the pictures.  If I liked the styling, I wanted the pattern not realizing that the item may not be the best for me.  Or, if I did not like the styling, I would reject the pattern though the shape was perfect for me.

What my mom taught me is to look at the line drawings on the back side.  By looking at the line drawings, you get a better idea of the shape of the clothing article without being distracted by some one's fabric choice.

Well, recently I relearned this lesson.  There is a pdf pattern company that I had passed by because the clothes really did not appeal to me.  But when they contacted Sally and I requesting a review, I gave them a second look.  I then realized what I did not like was their fabric choices, but they really had some cute patterns.  So I told them yes.


I have been away from home the last couple of months for work so I called my daughter and asked her opinion about the dress and asked what colors would she be interested in. She wanted black and light neon blue.  I made no promises but I set out to Joann to see if I could comply.  Well, I was unable to find exactly what she wanted, but I think she will like what I did pick out.  The dress is currently in the mail, so hopefully I can update this review with pictures of it on her soon.
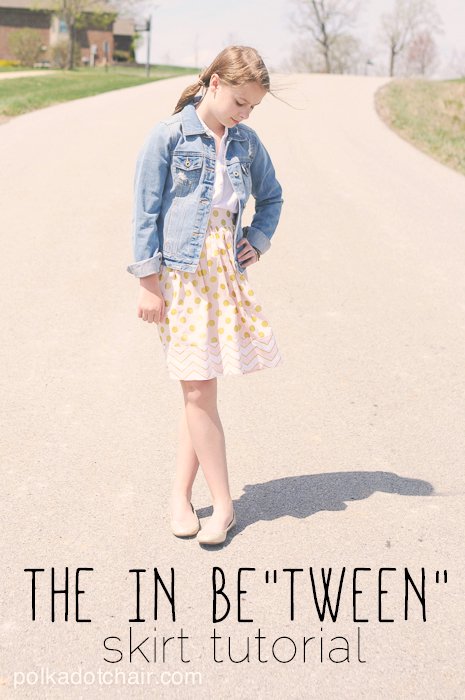
Pattern Source:  Create Kids Couture is an online, pdf pattern store and they have a whole line of tween patterns HERE.

Sizes available:  This dress comes in sizes 7/8 to 15/16; a great range for tweens.

Special materials required:  The top of the dress is a t-shirt style and must be sewn with a knit fabric.  The skirt portion may be knit or woven fabric but since the top is holding it up, I recommend you use a woven that is not too heavy in order to avoid unsightly stretching.

Skill level required:  I would say that this is an advanced beginner project.

The only deviation I made from the pattern is that I added the decorative element at the shoulder.


Good:  This is a fun pattern that I believe will be very comfortable for my daughter.  I really liked how the pleats give an option for contrasting fabrics.


Bad: I think this dress is a bit long.  I think it would be a little better if it was about an inch above her knees.  However, I am sure a growth spurt will fix this problem shortly.

Overall pattern rating:  I give this pattern (4) of 5 lighting bolts.


Monday, January 27, 2014

Up-cycled Color-blocked Celestial Pullover--With a Review

 Can I just say that I love to up-cycle/refashion/reuse?  I love going to thrift stores and clearance racks imagining the possibilities all for pennies on the dollar when it comes to fabric. It's a thrill. Needless to say, I love this challenge and interestingly enough my outfit looks VERY similar to the last go around of this challenge. And interestingly enough that dress still fits and it is one of her favorites. So why not go with the same color scheme again? 
Since Figgy's generously let us try one of their patterns that they have extended up to tween sizes (YEAH!), I thought that would be a great starting place.

May I present the Celestial Pullover Refashion of a Dress with an Up-cycled layering T to go with it.
It started with a dress of mine that I picked up from Target for 75% off. I liked the color and pattern of the fabric, but the dress itself was not very flattering.
From the dress I was able to cut the main part of the pullover (with a little extra piecing to get the cowl the right size). However, Sophia was hoping it would be a little longer. That's when we came up with the red color blocking on the bottom. I found some left over interlock knit I had laying around and it was perfect...color-wise and also because it was a little heavier than the gray which helped it to hang better. To add the length I just traced the curve of the bottom of the pattern and then measured equally all the way around to get the block. The tie from the dress can also be used now that the pullover is more tunic length, which she kind of liked.
Major Mama has already done a great review and covered the basics of what you need and the likes, so I won't go over that again. But I did want to share my thoughts with you about the Celestial Pullover by Figgy's.
 This was an amazingly easy pattern to put together. 2 pieces plus the cowl and the pockets (which you could omit if you wanted to throw together something really fast), but with great lines. What more could you ask for? Well the fact that Sophia LOVED it is just icing on the cake. She's already asked for a couple more and she wore it all day after I had her try it on. As she's gotten pickier with age, that is saying something.
The cowl is just perfect, not too tight around the neck, but not too loose that it looks too grown up on a 10 year old.  There is the high/low hem line that makes it look stylish (ignore the seam on my back piece--that's a result of using the dress. It had 2 side seams and then a seam at the back of the skirt part of...go figure, so I just had to make do).
But the nice thing is that with such a simple and basic pattern, you have more room to add your own personality...just look at the difference between mine and Major Mama's.
I didn't have the printing problem that Major Mama had, but I did have problems with the pockets hanging too low past the bottom hem. That could have been a result of the super stretchy knit I was using though and my daughter cramming her hands in too far.
My opinion...this pattern is definitely a 5 bolt one!
As for the layering t-shirt...I've been wanting to try this technique of making little hand warmers at the end of the sleeve for a while now. I used an old white t-shirt of mine that had gotten kind of stretched funny and just used one of Sophia's shirts as a pattern. I actually used the sleeves from the original shirt, just cutting them off where I needed as well as the bottom hem. Then I added some of the red knit on to the sleeves, following this tutorial of sorts (It's in Dutch, but that's what google translate if for, right?).
And there you have my Up-cycled look for this week at Project Run and Play.