Monday, September 30, 2013

Her Signature Style--Plus a Pattern Review

I asked Sophia to sketch me out what she would consider her signature style to be and she came back with a tunic that had a wide collar at the neck of some sort and leggings. (She's on a tunic kick lately) Her sketch of the collar wasn't really defined, but I had this pattern sitting around (McCall's 6785) and showed her option C. She said that would do.  She's also been wanting something out of the ruffle fabric so we went with that for her Signature Look.
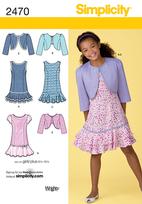
Here are the different options for McCall's 6785:

Line Art
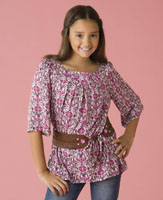
And here is the finished look:
(She didn't get to try it on until I wanted to take pictures while her little sister had dance, so it is a little longer than she wanted and I have promised to fix that. She also wants a coral colored belt to go with it, but I couldn't find one in the short amount of time I had...I'll be keeping my eye out for one though because I think that would "make" this outfit.)
The Review: 
Pattern: McCall's M6785 which I bought at JoAnn's when they had their patterns for 70 cents. It comes in sizes 7/8/10/12/14. For the tunic and leggings they recommend jersey, knit or fleece. For the leggings you'll need elastic.  That's it!

I sewed it up in size 8 for the width and size 10 for the length, but I would double check measurements before you cut. I also stuck to the pattern except I didn't finish the bottom edges at all...didn't need to with this fabric. That probably has a little to do with it being a little too long.
 Skill Level: I would rate this one as easy, with the disclaimer that you'll be sewing with knits. If knits scare you, this would be a great pattern to do in fleece, especially with the hood and pocket options. 
 This pattern is really only 4 basic pieces for the tunic and then whatever neck finishing option you use. The sleeves are raglan sleeves, which also makes this a great beginner pattern.
The leggings are your very typical and easy 2 piece leggings (one for each leg) and come together super fast!

 The Good: This is a great beginner pattern with very easy to follow directions. It was worth the 70 cents I paid for it. I would highly recommend this to anyone venturing into sewing with knits for the first time. 
It is also great because there are the different options for the tunic, which is great for those picky tweens.  This pattern would also fit a lot of different or changing body types, so that makes it a good buy for these tricky years.
The Bad: It doesn't work well with the ruffle fabric...at least not with the neck finishing that I used. But that was my own fault and not the patterns. She has asked for one in a more sweatshirt like knit using option B.
The Ugly: There wasn't really anything that bad with this pattern. It was a pretty easy and straight forward pattern, but I wouldn't pay full price for it.

The pattern is similar in the other tunic one I reviewed from McCalls and if I had to pick just one, I would pick that one over this one. I think the options (and my daughter agrees) are just more tween friendly.
However, overall I rate this pattern  for it's ease and adaptability.

Friday, September 27, 2013

Plus Size Round-up

During our kick-off event, we heard from a few of you that you are interested in finding some plus size options.  So, I set off to create a special plus size round-up.  Unfortunately, this is a difficult task ... even more difficult than just finding a fun and functional tween pattern.

But I was determined.  I found Simplicity has by far the best variety of plus patterns.  And if you go search on ebay or etsy, you can find some discontinued plus patterns from a variety of brands.  Below are some pretty good contemporary options that are available in stores and on the internet. 

McCalls 6690


McCalls 6693 views B and D

McCalls 6693 view A

 McCalls 6693 has several views to include two tops, the poncho, a skirt, and leggings.


Simplicity 2470
Simplicity 2689
Simplicity 1625


Simplicity 1548

 I also found a site called Pattern Making for Plus Size Children.  It had all sorts of basic patterns in plus sizes that can be modified and embelished. 
One option from Pattern Making for Plus Size Children

 I did not find any boy patterns that are labeled "plus" sized.  However, I know from experience that Ottobre Magazine often has a few patterns in each issue for 'husky' children and they have wonderful patterns for older boys.

Since there are so few plus patterns, it is even more important that you properly measure you intended wearer and get the fit right.  It will not be enough to just sew it as sized.  You will need to make sure the shoulders, waist, chest and length measurements are adjusted to fit the child.  But this is the wonderful thing about sewing for your tween.  With some effort, you can make something that really fits, and make that wearer feel like a million bucks.

As we do reviews, if we think a particular pattern is well suited for a plus size or simply curvy child, we will make sure to let you know.

Do you know of more patterns that are specifically labeled "plus" or "husky" that you can recommend?

Wednesday, September 25, 2013

BurdaStyle #149 Girl's Trousers


These are the pants that Abi was wearing for my cotton candy meets sugar skull outfit that you can see HERE.  They are a skinny jean that I made from some reclaimed light wash jeans.  I died them with a tie dye technique using Rit dye.  I was hoping to do an ombre finish, but my daughter liked the funkiness of the tie-die technique much better.  Since she is the one that has to wear them, we went with her opinions.

The Review:

BurdaStyle #149 Girl’s Trousers


NOTE:  This pattern does not come with seem allowances.  You must draw your own.

Pattern source: You may purchase this pattern online at BurdaStyle.com.  

Sizes available:  This is truly a tween pattern, but it is a European pattern sized from 134-158.  Just so you know, my daughter wears a size 10 in US sizes and a 140 in European sizes.  European patterns in general and Burda specifically do run a little slimmer than a US pattern.  So, if your child is curvy, it is even more important that you pay attention to all her measurements.  Also, these pants in particular have a skinny leg.  My daughter is thin so I cut it out with the smallest size on the width but a 140 (second size) for the length.

BurdaStyle #149 Girl’s Trousers


Special materials requiredYou will need interfacing, a single button or snap, zipper, and a denim needle if you choose to make the pants jeans like I did.  The pattern does call for a pant weight fabric with some stretch.

Skill level requiredThe pattern is rated intermediate and deserves this rating.  The fly zipper in particular has very specific steps.  Burda does not have the best instructions but they are workable if you take it slow and not try to get ahead of yourself.  At one point I was confused, so I unzipped my own fly and looked at the construction.  The instructions then made sense and I continued on.  The end result was a very professional looking pair of pants.

BurdaStyle #149 Girl’s Trousers
front


How I came to choose the pattern: I love the styling of burda so I ‘window shop' often on BurdaStyle.  When I came across these pants I quickly downloaded them because there are so few pre-teen pants with a real zipper fly.  

Did you deviate from the pattern?  If yes, how?  Not a lot.  It was perfect as designed.  I did add some elastic to the back of the waist for my skinny girl.  I will add more length to them next time too because the fit just a little too perfect.  Also, I am considering adding zippers at the ankle just for some interesting styling on a future pair.


BurdaStyle #149 Girl’s Trousers
back


Overall pattern rating:  This is a (a top score) bolt pattern.  I loved this pattern!  It makes the perfect pair of skinny jeans for your tween.  They are not too fitted and allow for good play and have a super professional finish.


Monday, September 23, 2013

Mad for Plaid Preppy Skirt

Here's a little quiz...go ahead and take a guess as to why I have a thing for plaid.
1. I played field hockey all through junior high and high school and loved wearing my plaid skirt for games.
2. I have a secret vice in that I love the show "Gossip Girls", mostly because I think they did a great job with their costuming.
3. I've always wanted to go to a boarding/private school because of the uniform...and I thought it would be cool to live away from home...in Switzerland.
4. All the above are true.
5. None of the above are true and plaid is just rad...to borrow a phrase from my tween years.

Here is my little creation for plaid week over at Project Run and Play. My reason for creating this was that I think there are a couple of pieces that any tween would love that don't require a pattern. A basic skirt with a side zipper (a little more grown up than elastic waistband) is one of them. I've made this skirt using the basic principles outlined below a bunch of times (here, here and here...just to name a few)

With a basic A-line you can create a number of different skirts. By stopping the A-line look at the hips you can add pleats or gather a panel to the bottom for a different look (if you do this you'll want to line the A-line part by cutting out 4 pieces). You can add a waistband, make it more full or a little more stream lined, not to mention the different looks you can get by making it different lengths.

Here's a quick rundown of how to figure out an A line skirt. Get a low waist line measurement (especially if  you are adding a waistband) and a hip measurement and then I add an inch or more to each to account for seam allowance and so it's not a hip hugger. Take a waist to hip measurement. Now you are set to "draw" your pattern out on your fabric. Make sure you take your fabric and fold it in half twice (you need the front and back piece). Take your waist + 2 inches (blue line) and hip + 2 inches (red line) measurements and 1/2 them. Now take the number you now have for your waist and measure then mark it on the top of your fabric (blue line).  Take your waist to hip measurement (green line) and mark it down from your waist measurement. From the fold take your hip measurement number and mark it at the bottom of your waist to hip line (this becomes the red line).
With me so far?
Now just figure out how long you want your skirt(purple line) and mark that, measuring from your waist. Then all I do is gradually extend the line from the end of your waist measurement line out--the straighter it is the more stream lined it will be while the more of an angle the more flared it will be.
Once I get it cut out, I finish the right side, add the waist band if desired, add the zipper and finish the left side. After that I fold down the waistband and finish it off.
For the waistband, I simply take the waist measurement and add 3 inches (you have to have room to put the zipper in) and cut out a 4 inch band to that length, line it with facing and add it to the top of the skirt. Then I'm ready for the zipper.

Here is the complete look...hopefully I'll be able to get a couple of pictures with Sophia wearing it...Monday's can be rather busy.***Yeah, we got a couple in before dance.***


The cardigan is made from 2 thrifted sweaters.  I used the Study Hall Jacket pattern to cut the sleeves, front and back.  I just used the waistbands from the sweaters as the cuffs and waistband of the cardigan. I still need to get Sophia's opinion as to buttons or snaps or nothing at all. I like the preppy kind of look. She's excited for the skirt because she can wear it in so many different ways.

So there you have it, an easy skirt that can be a great addition to any wardrobe.

Friday, September 20, 2013

Words of Wisdom from Rachel of Nest full of eggs

When we sent out the call for guest posts to kick off our new venture, we realized that it was just at the time for back to school and we might get a couple of "Not a good time". Well since we value and appreciate what everyone has to say we really wanted everyone to have a chance to contribute if they wanted to. 
Rachel, from over at Nest full of Eggs, is very talented and has some amazing tween boy looks along with some great tips that I'm so glad she took the time to share, even in this crazy back-to-school time of year. Take it away, Rachel.
~~~~~~~~~~~~~~~~~~~~~~~~~~~~~~~~~~~~~~~~~~~~~~~~~~~~~~~~
vest + trousers
 The current tween in our household is my 10 year old son (just turned 10 over the summer). I don't do a lot of boy sewing and I don't do a lot of tween sewing, but when I have done tween boy sewing I've kept a few things in mind:

1) Taking my son's favorite things into consideration: favorite colors (yellow, red), favorite animal (octopus).

2) I've stuck more with the classics and dressier type items of clothing: basic pants, trousers, sailor styled pants, vest, blazer, long sleeved t-shirts.

3) Looking at men's fashion for inspiration. It was a men's patchwork blazer that inspired my son's patchwork blazer. What is found for sewing for men can be helpful for tween boy sewing, for example: 9 fabrics ideas for men's shirts can be just as helpful for choosing fabrics when sewing a tween boy's shirt.

4) Paying attention to details, like adding piping to sailor styled pants and the lapel of a blazer, adding exposed zippers on the front pant pockets.

vest + trousers
 The sewing patterns I have used for my tween son:
Oliver + S Sailboat Pants (pattern goes up to size 8)
Oliver + S Art Museum Vest + Trousers (up to size 12)
Melly Sews Clean Slate Pants (up to size 8)
Melly Sews Basic Blazer (up to size 8)
Made By Rae Flashback Skinny Tee for Big Kids (up to size 14)
(I might be at an advantage being able to still use some smaller sized patterns as my son is really skinny, so I am able to use a size 8 or smaller than add length)

patchwork blazer tutorial
 I highly recommend visiting this blog post: Sew You Had a Boy: Siestas and Sewing where Cindy shares her knowledge and experience about tween boy sewing patterns and fabric selections.

sailor style pants
 I recently purchased this classic shirt (with collar stand) sewing pattern (up to size 12) and have plans for sewing my tween son a shirt in octopus fabric. Let's hope for the best, I've never sewn a classic shirt before!

zipper teeth trimmed neckline long sleeve t-shirt tutorial
 Happy tween sewing!
yellow pants with exposed zippers on the front pockets
Thanks so much for inviting me.

Wednesday, September 18, 2013

Lolly Pop Swirl--A Review of McCall's M6787

 Lolly Pop Swirl=Candy fit for a Tween and designed by a Tween
She asked for an outfit made from fabric with swirls in it which would remind her of lolly pops and I think I delivered.
Why candy do you ask? Because it's Candy Inspired week over at Project Run and Play
Lolly Pop Swirl--McCall's 6787
The requirement I gave Sophia was that her design needed to use this pattern, because I wanted to give a trial run in order to write a review. It's McCall's M6787.
Sophia came up with this outfit (which she sketched out with her fashion design thing), which she said reminded her of the swirls on the really big lolly pops with lots of different colors.
Lolly Pop Swirl--McCall's 6787
I think I was able to capture her vision. I just wasn't able to find a good contrasting patterned knit for the leggings so I went with a solid purple.  And since the fabric for the top was a little see through I made a little shirt for her to wear under it out of the same fabric. I found both at JoAnn's. 
Lolly Pop Swirl--McCall's 6787
Pattern--McCall's M6787 (as of the time I wrote this, the pattern was on sale for $3 at McCall's site, which is a pretty good price.)
It comes in sizes 7-14 and there is a plus size version as well.
Materials--No special materials needed beyond fabric and elastic
Skill Level--The pattern itself is very easy to sew together and only requires basic skills, but it is all done with knit fabrics which can be tricky at times (especially if you are like me and pick a knit for the top that is kind of lacy like and is a pain to sew). When it comes to knits I highly recommend using your serger or at the very least investing in a double needle.
Lolly Pop Swirl--McCall's 6787
I picked this pattern up because it goes with my daughter's style of clothes and it seemed like it would be pretty versatile. There are 4 different versions of the top. What I learned was that it was a really easy sew. The pants came together in less then an hour (thanks to using the serger) and the top wasn't that difficult either. 
The only thing I did different was that I did not make the casing for the elastic at the waist of the shirt or even use the elastic. My daughter is more of a belt person and does not like the riding up effect that comes with shirts that have elastic at the waist. The belt is some stretchy ribbon stuff I found at Hobby Lobby sewn on to a set of 'D' rings.
Lolly Pop Swirl--McCall's 6787

The Good--This was a great pattern to make, simple and straight forward. It would be a great learning to sew with knits pattern. It also came together super fast. I will definitely be doing this one again and try out some of the different variations for the top. The top is the highlight of the pattern. The leggings are really just your typical 2 pattern piece pants with an elastic waist.
The Bad--Really there isn't much bad to say. The only thing wrong with it was probably my fault. I sewed a size 10 and it gapes a little at the neck line and I probably should have gone with an 8. She kind of fell in between the sizes for most of the measurements so I went with the bigger size, giving her room to grow.
What do I think of this pattern?  Definitely lightening bolts     !

Because the top gapes, I gave sewing a undershirt a try. I just used some of the left over fabric from the pants. I wish I had just a little bit more to make it a little longer, but you make do sometimes.
I just used a shirt of hers as a guide and cut out the neck, the side and the arms. I left the fold at the top (the fabric you see here is folded into fourths) for what would have been the shoulder seams and I didn't cut out sleeves. Use the whole shirt to cut out one big piece for the front and back each. Then you sew up the side seams and finish the edges as desired.
Lolly Pop Swirl--McCall's 6787


Linky Party Round Up

It was so much fun to see what you have been up to when it comes to sewing for tweens! Wow, are you guys the creative, industrious bunch! So many great ideas and so much talent. We here at Sew Cool are each going to chose a girl and boy look...but you guys make it so hard. They were all great looks and each added to my file in my brain of what to or how to sew for my tween.  
So here are my picks...but really I could have picked any of them and because they were all so great.
Stacy from the Land of KA shared her flamingo dress and this one caught my eye because it epitomizes the tween years and the struggle that is sewing for a tween, namely something a little more grown up but still catches that youthful, childlike quality that they aren't quite ready to give up.
And this boy's look from sew a straight line, so stylish and classy looking...it makes me kind of sad that my boys are into their teenage years, but put the idea into my mind that maybe I could still sew dress pants for them.

Major Moma here, it is now my turn to pick my favorites and I have to second what Sally has said.  You guys are making some great tween cloths!  I see all these women making cute clothes for their toddlers and I just think, how those skills will lead to some pretty awesome tween clothes in a few years.  And for you ladies ... your time has come.


My girl pick is our only accessory and was made by Gina's Craft Corner.  I just think these cuff bracelets are so fun and could really be made to fit the personality of just about any girl.


And my boy pick was one that kept coming back to my mind made by Rachel of Nest Full of Eggs.  I just love how a simply t-shirt turned rock-n-roll by adding a zipper embelishment.


So we hope you will keep adding links as you keep sewing for your tween!  We'll open a new linky party the first Wednesday of every month, so come and share!