Showing posts with label tutorial. Show all posts

Friday, March 27, 2015

Pattern Review: M6596 top

I was looking for a way to try some new techniques and use up some of my knit left-overs from other projects and I grabbed out McCall's M6596 to assist.

The pattern is very basic, so I knew it would be perfect for letting me concentrate on my new skill building.  What I wanted to learn how to do was a flatlock seam on my serger.

I sewed up view D for this project.

Pattern Source:  I bought the pattern at JoAnn's on sale but you can buy it on McCall's website too.

pattern review


Sizes available:  It come in sizes 3 to 14 and consists of variations on the same flared knit top and sweat pants.

pattern review


Special materials required:  The pattern is designed for moderate stretch knits for the top and lightweight woven fabrics for the pants and accent fabrics on the top.

pattern review
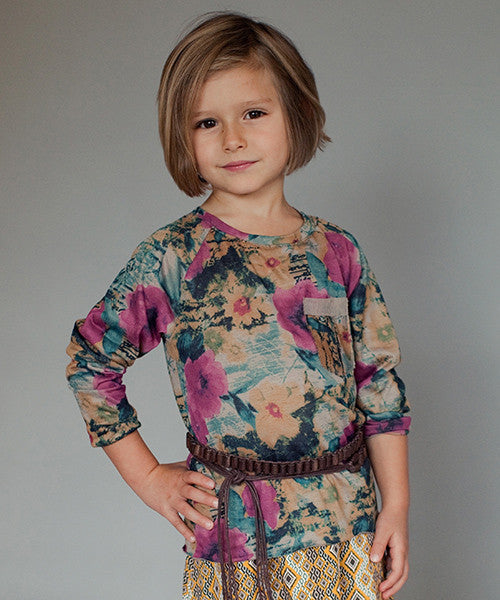
an upcycled version I did with a sweater that was given to me 


Skill level required:  The pattern is labeled easy and certainly deserves that label.  I found the pattern to be incredibly simple.  But, I think the sleeve insertion method is unnecessarily complicated.  It has you sew the main body, then the sleeve, then insert the sleeve.  I like the technique of sewing the shoulder seams and then the cap of the sleeve to the shoulder.  Then you sew from the wrist down to the hem for your side seams.  It is soooo (or sew) much easier.

pattern reveiw


Good: A cute and comfortable top.

Bad: The way the side flares out is the trend now but I don't find it especially appealing.  My tween does though, so that is good.  And I already said that I found the instructions did not teach you the most efficient way to construct this simple garment.

Overall pattern rating:  3 Bolts 

Now, on to my flatlocking experiment.  Flatlocking is a technique that you do with three threads in your serger where you sew your seams together but then pull the fabric apart so the edges of the fabric actually butt up against each other joined by the visible threads.  The technique is popular for work out clothing so that the seams don't chafe and for thicker fabrics that would have a bulky seam allowance if sewn the normal way.

pattern review and flatlocking a seam
a view of my semi successful flatlocking


If you are interesting in learning more, here are a couple tutorials with some helpful sights.

Tutorial by Made by me & Shared with you

Thursday, January 22, 2015

Bubble skirt et all

There is nothing quite so easy to sew as a skirt. The fitting is fairly simple and you can often get away with two side seams and a waist band.


And when you want more variety, there are a ton of great tutorials to help you create this wardrobe staple. 

Project Run and Play is doing something different this year by having a linky party each month for a pattern remix. January is Alida Makes' Bubble Skirt/Dress.  When I saw the theme, I thought it was the perfect time to review the tutorial and highlight other great skirt tutorials. 
In order to avoid the shirring requirement in Alida's skirt, I used a knit (an old shirt belonging to my son before he out grew it.). I simply stretched it while sewing it to the main fabric the way you would ribbing on a tee shirt. 


For the waist band I used the technique described on Made in this great circle skirt tutorial.

link

On our Pinterest site we collect all sorts of tutorials we like that you can check out but here are a couple other great skirt tutorials for you to try:

link
link
link


The cardi that is in this picture is from last year. She actually has barely worn it because she was not a fan of the ruffles. Tweens can be so fickle. But I think they pair beautifully and much better than the jeans she insisted on wearing with the skirt. 


There is also a very fun event at Friends Stitched Together; a series called CraftingCon and this month's theme is Dr. Who. My daughter loves the show and I thought I could style her up as a tardis for a photo shoot. But she was not in the mood. 

Friday, October 17, 2014

Making Colored Fur Coats

Now that you have decided whether your tween would wear colored fur, how are you going to make it?

Pale Cloud


Fur is not hard to sew, but it does have some special considerations.  One is all that fur.  What you will need to do in order to reduce bulk, is to trim the seam allowances down.  That way, you can sew without all that fur in the way and your seams will not be too bulky.  Second after sewing, you will need to take a small tool, like a stylus, and gently pull the fur on the right side out of the seam.

For more tips on how to sew fur, you can go to this Instructables post or Sew 4 Home.

Several stores carry colored fur and minky is a nice alternative to faux fur.  Here are a couple fabric options that caught my eye on Fabric.com.

Minky Crushed Cuddle fabric

Minky Soft Lattice Cuddle fabric
Minky Crushed Cuddle fabric

There are several jacket patterns out there, many that we featured on our "Making Moto" post in September.  But as winter is coming around the corner, I thought I would also point out some great heavier jacket patterns.

Burdastyle Long Dress Coat


And if making a whole coat is not on your list, then what about a hat, scarf, or some mittens.  Then your tween can follow this trend without you giving up a couple weekends.  Here are a few tutorials you may find useful.

Sew Creative
Flamingo Toes

How to Sew a Fur Hat video  

If you make something with fur, colored or otherwise, we would love to see it and hear about your experience.  You can link up to our monthly party or shoot us an email and maybe we can have you guest post!

Friday, October 3, 2014

Costumes --> Steampunk style

Halloween is fast approaching and I am sure your tweens are trying to figure out what they want to dress as.  I (Major Moma) have never been especially a fan of Halloween as a holiday but I have always loved dress up and creative play.  When my kids were little, their Halloween costumes went straight into the dress up box and were used all year around.

But when the kids get older, it can get a bit awkward.  They still like to dress up and they definitely like getting candy, but they are starting to get too old for trick-or-treating.  And have you seen some of the older/bigger sized costumes?  I think the shortness of the skirts are more scary than the blood and gore.  And that is the beauty of a homemade or semi-homemade costume, you can adjust it to be age appropriate to fit your family's values.

The other issue with kids at this age is getting a more 'grown up' look to their costumes.  I would like to highlight a genre that I think can really help with this dilemma.  It is Steampunk.


According to the Urban Dictionary Steampunk is:

source
Star Wars done Steampunk
... a subgenre of speculative fiction, usually set in an anachronistic Victorian or quasi-Victorian alternate history setting. It could be described by the slogan "What the past would look like if the future had happened sooner." It includes fiction with science fiction, fantasy or horror themes. 

Medieval Steampunk: Speculative fiction set during the Middle Ages. 

Victorian Steampunk: A modern Science Fiction work (post-1930s) that is set in the early parts of the industrial revolution. 

Western Steampunk: Science fiction set in the American Old West. 


Western style Steampunk

Industrial/Modern Steampunk: Science fiction taking place in the late industrial age, early modern age; i.e. World War 1, World War 2
Examples of steampunk: 
Wild Wild West 
Final Fantasy 7 
Van Helsing 
The Time Machine 
Hellboy 
Sky Captain and the World of Tomorrow

You can see from this definition and examples that the Steampunk genre really has a lot of variety.  And, you can take just about any character and make it a Steampunk version.  Like, you could take that old princess costume that still fits and add some gears, make the skirt a bustle and call it a 'Steampunk Princess."

source


Here is a tutorial on how to make a gear that can be added to clothing to create a Steampunk look.
gear tutorial
Goggles also are an accessory used quite frequently in Steampunk cosplay.  Here are several examples of DIY goggles that people have put together.  Some are quite elaborate, but you could get some great ideas from looking at them.
source

I have added a lot of Steampunk ideas to our Pinterest Costumes board and you could see if any of them work for your tween.  We have other Halloween costume ideas also pinned on that board, so feel free to check them out.  I hope you got some ideas on how to get creative with your tween's costumes this year!

What is your tween dressing as this year?

Monday, September 22, 2014

Tutorial: conserving patterns

Do you use PDF or paper patterns?  I use both, and they each have their own draw backs and highlights.  But what I do like about a pdf pattern is that I can cut it to the size I need, and then, when my kids grow reprint and cut the new size.

But with paper patterns, if you cut out the size you need, you are pretty much stuck and would have to re-purchase the pattern.  If I want to save a paper pattern for future use, I will use the following technique.

using the small size without cutting away the larger size

First, I cut the pattern out using the outermost line, regardless of size.  On the straight lines, it is easy; fold on the size you want to use.  It is on the curved parts that things can get tricky.  I slice down to the size I want to use perpindicular to the cutting line.


This will make small wedges that can now be folded under smoothly.  Continue around all curved edges.


When you cut around the pattern, you will need to be careful to not snip the edge of the pattern.  That would cut the fold, and defeat the purpose of all that work for conserving.


Do you have any tricks to conserve your patterns?

Monday, May 19, 2014

Shell in my hand; Sand in my toes...

Spring is in full swing and summer is just around the corner so, what are you sewing to get ready for the warm weather?  When I think of summer, I think of trips to the beach, water, gun fights, and finding a local water park to splash around in.  And what do all of these things require?  A swimsuit.


 In anticipation of all the water fun, I thought it would be fun to have a series on sewing swimwear for our tweens.  So for the next couple weeks we will be hosting "Shells in our hand; Sand in our toes..."  Hopefully we will motivate some of you to sew up some swimsuits and if you do, please share with the group on our linky parties!


There are a lot of people out there sewing swim suits!  I thought it would be hard until my first one three years ago.  I then found out that swimsuits are way easier than they seem and really worth the effort.  So often when I sew I am not really saving much money.  You can buy cheap kids clothes easily.  I really sew to get the particular look my children/I want and for the personal satisfaction.  But sewing a swimsuit can be much cheaper than buying one.


Zaaberry has a great step-by-step tutorial on how to make a basic one piece suit.  This tutorial should take all the mystery, and fear out of making a suit.

Everyday Chaos
Here is another tutorial by Everyday Chaos talking about how she made this simple one-piece.

Sugar cubes and spice cake

Sugar Cubes and Spice Cake gives some great tips on how to sew binding on your swim suits.

Now that you see how to make the basics, what about modifying that classic one-piece?


Creative Chicks

 Creative Chicks has a virtual laundry list of tutorials on various modifications to your one-piece.

No Big Dill

No Big Dill tutorial
And have you seen the suits Katy has made at No Big Dill???  Really, her's are amazing.  I love staring at them to get inspiration for my daughter and she has a tutorial on how to make simple but very cute modifications to a basic tank one-piece suit.

 There are a couple of ways to finish the edges of a swimsuit.  One is to use a lining without binding.  Another is to bind the edges with a contrast or self-fabric.  This can create a nice finished and professional look.  And I learned through reading several blogs that some of you are using fold-over elastic as a binding on swimsuits.  I bought some recently for my project that you will see later on in the series and watched this video on YouTube:  How to sew fold over elastic.  It was incredibly helpful.  I like the look of it but am unsure how it would hold up under heavy exposure to chlorine.  But since my girl does not swim often, I am not worried.

Now that you have some inspiration:

Ready,    Set,   Go!


Wednesday, March 19, 2014

Polkadot Circle Dress

  Tween Polkadot Circle Dress6
 Bonjour! I am Natalie, a Canadian gal who blogs over at La gang à Nat. In my little corner of the web, I chat about the sewing that I do for my three girls, ages 2, 4 and 11. I am quite excited to have been invited here by Kelli and Sally to show you a garment that I created for my tween Maïan! Ahhhh... the 9 to 13 age group!!! Is anyone else struggling with dressing up a capricious tween! Admittedly, this is a tough age group to sew for... they're not little kids anymore and they certainly don't want to dress child-like. But they're not grown ups either and as parents, we don't want to see them dressed up as women (or even worse, TEENS! GULP!). There will be plenty of time for that, no? Few stores cater exclusively to this age group and compounding the problem is the fact that many sewing patterns only go up to size 8. Tween Polkadot Circle Dress8
What I'll show you today is how to create a circle dress based on a garment that you already have at home, or a basic bodice pattern. So if you'd like, follow me home for a quick tutorial! Tween Polkadot Circle Dress7

Thank you so much Kelli and Sally for having me over today!    

Monday, March 3, 2014

Thinking Spring--Looking Ahead to the Trends

If you think it, it will come right?! With the hopes of warmer weather, how about a little looking ahead to Spring-y fashion for tweens, with some suggested patterns as well so that you can achieve these looks. 
First up here are some looks. Sorry, they are all girls. It just seems that boys fashion doesn't change all that much, except maybe for the bagginess of the pants...but I'll keep looking.
Also, all but Bardot are Scandinavian designers. Bardot is Australian. I think the simple designs that rely on the lines of the garment and fabric choices, so common in Scandinavian design, lends itself to being tween friendly. Most tweens don't want all the frills and ruffles anyway.

I tried to pick things that represented current trends, but also would be easy to replicate.  Here's what I came up with. I'll give you the designs first and highlight some of the trends and then at the end give you the patterns as suggestions to get that look.

Check out this exclusively tween fashion line called Frosk. I love the bold but simple patterns, the simplicity of the designs themselves and the fact that they are tween friendly (ie No belly buttons showing and appropriate length)
Trends to take note: Bold, geometric prints paired with white as well as other prints; straight lines of the dresses and skirts; wide sleeves
frosk_wear_ss14

Pale Cloud is another line that I have fallen in love with. They are a little less edgier and a little more elegant/romantic looking, with softer edges and more pastels. Just trying to find something for everyone here.
Trends to take note: Jumpsuits/one piece outfits; baggy up top pants ; yellow, wide sleeves
 Pale Cloud, SS14 Look 9, Spring Summer 2014 Pale Cloud, SS14 Look 5, Spring Summer 2014


 Peit by Sofies Schonoor is definitely edgier, but certainly right on trend
Trends to take note: Jumpsuit/One piece, whether it's pants or shorts; Bold patterns; animal prints; black and white; baggy up top pants
  
Bardot is the Australian design line I stumbled across. 
Trends to take note: Jumpsuit/one piece; animal prints; geometrical prints; baggy on top pants
 
The nice thing about all of these looks, is that they are all totally do-able for you to make on your own. Here's a couple of suggestions to help you on your way:
147_1013_b_large
From Burda Style you can get the simple lines and wide sleeves...the pattern is free, but only goes up to about a size 9. This one wouldn't be hard to add some inches for width at the shoulders and waist if needed as well as length. You could also use this as a spring board for making a wide sleeved jumpsuit, by combining it with a gathered waist pants pattern. Speaking of jumpsuits...
Jumpsuit tutorial from Simple Simon and Co...they are always ahead of the trends over there. It's even in yellow too, which seems to be a hot color for this season, as well as the neon...I keep seeing that in all of the stores (not necessarily in the design lines though).
And Peek-a-Boo patterns just came out with a jumpsuit pattern as well.
Image of Amelia Dress & Romper
There are so many options when it comes to jumpsuits...
This dress pattern is similar to the one in the Frosk picture and we reviewed it here.
The Go to Patterns Anywhere dress has some great simple lines that would work well with the current style and you could pair it with a bold print or even an animal print...or how about an animal stenciled strategically on someplace. I'm thinking at the hem or on the side vs. in the middle.
And here are a couple of shirt ideas...just click on the shirt to find the pattern.
Serephic Raglan by Figgy's
Skipper Top by Sew Much Ado
147_0813_b_star_shirt_large
Burda Style free pattern
  As for the pants, I couldn't find any one pattern that fit the bill, but if it were me I would take a pajamas pants pattern and make them draw string, instead of elastic. Then I would play with the width of the legs, till they were a little more fitted and straight legged. Once again the lovely ladies over at Simple Simon and Co have a great tutorial about drafting your own.

So there you have some Spring inspiration for your sewing!