Monday, March 31, 2014

Pattern Review: Shirt With Bow Tie 08/2012 #152


Ok, we just don't do enough for boys here.  But the problem is that Sally and I do not have tween boys.  Sally's boys are already well into the teenage years and my boy is only 6 years old.  To compensate, we try to have guest bloggers come over and give helpful hints and pattern reviews.  But there does not seem to be a lot out there.  Which is too bad because I love to sew for my boy and I hope he continues to greet his mom-made clothes with enthusiasm as he grows. 

This is the picture from Burdastyle.


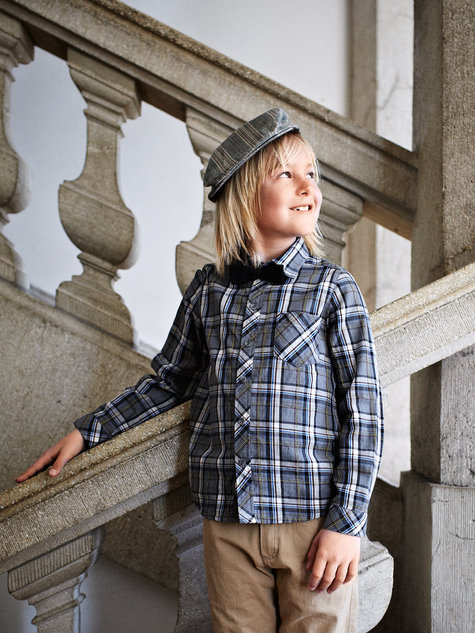
Today I am sharing a pattern I made for my son but the sizes go up to 140 (European sizes) which is about a size 10.  Plus this pattern could easily be lengthened so if your son is thin, you probably would not have to make too many adjustments (length and shoulders).


The review:


Name of the pattern:  The pattern is called Shirt With Bow Tie 08/2012 #152 which is not that creative of a name.  I have not yet made the bow tie, but I plan to soon.


Pattern Source:  This pattern is a print at home .pdf that you can purchase at burdastyle.


Sizes available:  It comes in European sizes 116 through 140.

Special materials required:  You need eight buttons for this shirt, six down the front and two for the cuffs.  Also, you will need interfacing for the placket, cuffs, and collar pieces.


Skill level required:  The shirt is an intermediate level pattern.  This is actually my fourth time sewing it and the first did not look this good.

How you came to choose the pattern:  I am starting to have this be my go-to pattern for my son.  He likes to wear button up shirts and they are nice for church.  I have made him a couple out of flannel and this one is for Easter.  He picked out the fabric as he is a bit of a wild guy when it comes to fashion.

I used a decorative stitch to fancy up the yoke.

 Good:  I love the professional look that this pattern gives the end product.  I could buy dress shirts that look just like this but I love that I am able to make them so that they fit my slim guy and in the crazy fabrics that he prefers.


Bad:  That wrist placket is tricky.  Take your time and you will be fine.  Also, the pattern does not come with seam allowances, so you will have to add your own.  That is not hard, but it is annoying.

Overall pattern rating:  I give this pattern (5) bolts.  If you asked me the first time I sewed it, I probably would have only said 4.  But, I am coming to find out that the problem was not with the pattern, but with me.

Friday, March 28, 2014

March Linky Party Wrap Up

It's time to wrap it up again, better late than never right?
This was the month of pants.
Over at Cathgrace, she had a lovely idea to make those pants last a little longer by adding a tuxedo stripe down the sides. It's about the tween years that my kids start out growing pants instead of wearing them out first, so this is a great way to extend the life.
tuxedo striped jeans 11 458x1000 Tuxedo Striped Jeans *OR* How To Make Your Jeans Bigger
And Cari Homemaker has a great jeans pattern she found in an Ottobre magazine. I love the contrasting top stitching and pocket linings...great way to make simple jeans your own.
Romeo jeans 1
Thanks again for linking up everyone and come back the first Wednesday next month to link up again. We can't wait to see some spring sewing!

Wednesday, March 26, 2014

Pattern Reivew: Burdastyle Drawstring Long Shirt

Last Spring, my family and I were wandering around a Bavaria town (Germany) on the Boden See.  It was a beautiful resort town and had a lovely walking area with fancy shops.  I was doing some window shopping and saw some really neat outfits that were sewn with fabrics that had patterns all in creams and light browns but the trims were in neon yellow.  It made quite an impression on me as I keep thinking about trying to do something like that myself.

Well, the time family came as I was digging through my fabric and found this wonderful check that was given to me.  I think it is a linen-poly blend because if feels wonderful but does not wrinkle much.

I used a pattern for a shirt dress from burdastyle that I thought would suit the understated neon trend.  The fun thing about this pattern, is that it is designed to have three different looks.

Drawstring long shirt


This first one is the pattern I used.  I used ribbon for my draw-string, but it calls for you to make your own out of the fabric that matches your shirt.  I also used the pockets from the second version.

Belted long shirt


The second also is a long tunic, but it does not have a drawstring.  Instead, you add belt loops and make a belt.  It also has a pocket. So, it is not that different than the first but the details make it have a different feel.

Ruffle blouse


But the third version is considerably different.  It is shorter, has only a band for the collar, and has ruffles down the button placket.  I think this creates a very sweet but grown up blouse.  I am sure I will try it some time.

And now for the review:


Sizes available: The pattern comes in European sizes 138 to 158.  My daughter wears a size 12 in U.S. sizes and I made her a 146.


Special materials required:  Because of the length of the shirt and the cuffs on the sleeves, you need quite a lot of buttons.  Also, I would recommend that you use a ribbon for the tie because making long skinny little tubes of fabric can be annoying.


Skill level required:  This is definitely an intermediate pattern as labeled.  That being said, the technique used to sew on the collar and the cuffs make very professional results.


Good:  This pattern has fabulously professional techniques and the results look better than store bought for the typical pattern.


Bad:  There is nothing bad about this pattern but it is certainly not for a begginer sewer.  But once you have decided to take up a challenge, it is well worth the added effort.
 
Overall pattern rating: I give this pattern4 bolts.


Monday, March 24, 2014

Fancy Headpieces

In January we shared a round-up of of various accessories that you could sew up for your tween.  But today I thought I would share a non-sewn accessory.  This winter I wanted to make some over the top hair clips for my girls.  They like to wear fancy headbands and barrettes and I was hoping to make something that would coordinate with their mom-made clothes.

barrette version

First, I went to a craft store and picked out a couple blank headbands and metal barrettes.

Then I just went a little crazy.  I picked out items from the floral section, the beading area, and a bunch of feathers.

headband version


I took all that eclectic haul home and warmed up the glue gun.  I just started to arrange various items until I figured out what I wanted it to look like.  And then it was just a matter of gluing it all down.

small barrette

These are obviously winter themed.  But think about all the other holidays out there.  You could make a headpiece that works for Easter, 4th of July, Canada Day ... the possibilities are endless.  And this is a project that your tween can do with you.

What?  You don't like mine; or they are just not your style?  Here are a ton of there tutorials and options:


leather bow tie
I love this bow tie by delia creates.  I think it would be great for a tween boy because leather can look so cool and stylish.


Speaking of leather, what about a leather headband?  Ruffles and Stuff has a neat tutorial for a simple leather headband that would look good on ladies of all ages. 

And if you do not want to buy blank headbands or barrettes, you could make some with scrap fabrics. Some good tutorials for fabric headbands are (link in the comments):

pearls and pleats
Beachy headband
ribbon headbands
Reversible fabric headband

There are lots of no-sew options in case you don't want to get out the sewing machine for your hair accessory project.

Crafting Sarah woven headband

For something a little more understated, you can weave ribbons around a blank headband.

sailor knot headband
This is another no-sew option using old t-shirts or scraps of knit fabric.

fabric feathers headband

I personally love this dramatic no-sew headband.  As you can see by mine up top, I like a dramatic headpiece.

la fleur headband

And here is one more option.  This one is absolutely beautiful and would be lovely on Easter Sunday.

Have fun making accessories and please link your creations up to our parties so we can gain inspiration from you.

Friday, March 21, 2014

Pattern Review: Jolly Roger Raglan Tee

I am so excited to be over here today! I'm Karly from Paisley Roots. My oldest is 10 but teetering between size 12 and 14. He loves me sewing for him and I've had a lot of fun finding patterns that fit his style.
Today I'm going to review the new Jolly Roger Raglan Tee Pattern from Patterns For Pirates.
The sizing is from 3m-14 years.
3 sleeve lengths
Sleeve and waist band options
This pattern is for knit fabrics and is gender neutral.
The pattern doesn't state a sewing level, but I would say a beginner could very easily make this pattern.

I'm giving it 5 bolts cause the fit is fantastic, pattern aligned perfectly, construction was super fast and easy and with all the sleeve options, this pattern will work year round.
I made the 3/4 sleeve for Gavin. Kind of giving Spring a nod to come while at the same time not giving Winter any false hope that I want it to stick around....

He loves it and is incredibly comfortable in it.
Seriously, if the kid is proud to show it off to his class, that's a hit!

Thanks for having me over!